-
Static Site Generator - Jekyll
-
Continuous Integration - Travis
-
Create a new repository named “username.github.io” on our GitHub, where username is our user-name on GitHub.
-
Clone the repository to the folder where we want to store our project locally on our computer:
~$ git clone https://github.com/username/username.github.io -
Create an index.html (the default web page) and add other files related to our project in the project folder.
-
Add, commit, and push our changes in the project folder to GitHub using the following commands:
~$ git add --all ~$ git commit -m "Initial commit" ~$ git push -u origin master -
Now we have generated our website: “http://username.github.io”.
-
Create a
CNAMEfile that contains the custom domain (the content of the file is: “yourdomain.com”) to our repository’s root directory (in our repository’s Pages branch). Then commit and push the file. This is to redirect our GitHub Pages site using our custom domain. -
Configure a custom apex domain (e.g. yourdomain.com) - for the root apex (@) to point to username.github.io
-
If our DNS provider supports ALIAS records or ANAME records, we may choose to create an ALIAS or ANAME record and point it to username.github.io instead.
-
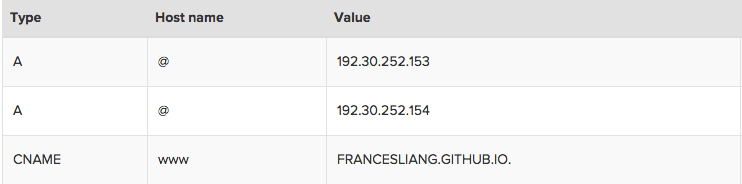
Otherwise, with our DNS provider, create A records (in the DNS manager) that point to the following IP address:
-
192.30.252.153
-
192.30.252.154
-

-
-
Configure a custom subdomain (e.g. www.yourdomain.com) - for
www.to point to username.github.io- In our DNS manager, create a
CNAMErecord and point it to username.github.io. See the following as an example:
- In our DNS manager, create a
-
Check if the name server has been updated using the
digcommand:~$ dig *yourdomain.com* +nostats +nocomments +nocmd -
CSS - layout and style etc.
-
Components - glyphicons, drop-downs, button groups, navigation, alerts and so on
-
JavaScript - a programming language for the functions of a web page
-
Huge user base - it is perhaps the most popular comment system among bloggers and website owners.
-
Simple integration with the website - we could find out more instructions on how to integrate the comment platform into an existing website after we’ve signed up with Disqus.
-
Mobile friendly - the interface swaps in term of the different media so the commenting won’t be affected with different displayed screens.
-
Real-time comment - latest comments are displayed instantly without the need to refresh the web page. Images, links and videos can also be attached to comments for posting.
-
Strong moderation features - the comment authors who create an account with Disqus and leave comments on any website with Disqus, will get email notification whenever the blog post gets a new comment, or someone likes or directly replies to their comments. What’s more, the blog owner has the control to enable comments to be published, hold them all for moderation or allow those with verified emails to be published.
The Development of This Blog (I)
This is the first time that I tried to write a personal tech blog and the first time that I tried to build a blog from scratch. So I was thinking to write a post as a record of how I did it. Even though there are lots of website templates out there for people to choose and we can probably use one of those that people share on their GitHub for free, I feel more satisfied by building the blog on my own. Plus, it is a great opportunity for me to learn about web development as a beginner.
Before actually building the blog, I need to consider what type of web pages I would like to build. Generally, there are two - static and dynamic. Static web pages deliver to the user with the same pre-built content each time the page is loaded. They have the same structure and content unless the web developer updates and publishes new changes. In contrast, dynamic web pages are generated by a web-application. These pages have server-side scripts which are processed by the application server to generate unique content every time the page is loaded. As for a personal blog, its implementation is on a small scale without many pages required, it doesn’t need to be generated on-the-fly and I will be the only one who manages and updates the website; therefore, a static web page is more suitable for my need.
The other thing that I would like for my blog is a custom URL. I got my domain name free through attending a start-up weekend, so I will skip the detail of this step. But it wouldn’t be hard to get a custom domain name from many domain name registrars in the market.
Once I’ve decided what type of website I would like to develop and got my custom domain name, I can now actually start building my blog. Here are the components of this blog:
I will discuss the last two components in the following article as the second part of this post.
Blog Hosting - GitHub Pages
Generate a Site
First of all, the blog needs to be hosted through a web hosting service, so that the website is accessible via the Internet. I use GitHub Pages, because it’s free and I was going to commit the files for this blog to my GitHub anyway. If you are not familiar with GitHub then here is their website.
As the instructions mentioned on GitHub Pages, the followings are the steps to create a site:
Customised URLs
You may notice that the URL of the website we just created is “http://username.github.io”. In order to use a custom URL, we need to set up the custom domain with GitHub Pages:
If the configuration is successful, we should be able to access to the website through both yourdomain.com and www.yourdomian.com.
Blog Design - Bootstrap
Once the website of my blog is up and running, it’s time for the actual design of what to write on the bloc and what the blog should look like. Basically, there are two main parts of a website - what we read (content) and what it looks like (style).
HTML and CSS
HyperText Markup Language (HTML) is used to construct the structure and the content, like the skeleton, of a website. Each website can be divided into many blocks of different sizes, which is similar as a grid system. HTML elements, which consist of HTML tags, put those blocks together like a puzzle to form the basic structure of a website. In each block, the content, such as text and image, is also described in HTML. These HTML files can be read by web browsers and be rendered into a readable web page for audiences.
Even though the basic layout and content is created, it still won’t be much pleasant to read with just black text and white background. Cascading Style Sheets (CSS) is used to define styles of a website and make it look pretty - the presentation of a web page. It includes the design, layout, colours, fonts, etc. The CSS files are normally stored separately from the HTML files; therefore the style defined in a CSS file can be applied to the content of many web pages, and vice versa, the same web page can have many different styles by implementing different CSS files.
Bootstrap
Since a web page has so many components, such as tables, buttons, and responsive utilities, some kind of templates would be useful to implement and re-use those components, instead of coding from scratch. To do so, I use Bootstrap for this blog. Bootstrap is a free and open-source front-end framework, which has a collection of tools for web applications. It contains both HTML and CSS based design templates. There are three major parts of the library:
Boostrap can be downloaded here with instructions of how to use the framework. Basically, we just need to put the download folders in the same directory as our index.html file and include the following codes in the header of the HMTL file
CSS style sheet:
<link href="css/bootstrap.min.css" rel="stylesheet">
JavaScript plug-ins and its necessity - jQuery:
<script src="https://ajax.googleapis.com/ajax/libs/jquery/1.11.3/jquery.min.js">
</script>

<script type="text/javascript" src="/js/bootstrap.min.js"></script>
We could also include Bootstrap from a CDN (Content Delivery Network) without downloading and hosting Bootstrap ourselves. MaxCDN provides CDN support for Bootstrap’s CSS and JavaScript; therefore, we just need to include the following links in our HTML file:
<!-- Latest compiled and minified CSS -->
<link rel="stylesheet" href="https://maxcdn.bootstrapcdn.com/bootstrap/3.3.5/css/bootstrap.min.css">


<!-- jQuery library -->
<script src="https://ajax.googleapis.com/ajax/libs/jquery/1.11.3/jquery.min.js">
</script>


<!-- Latest compiled JavaScript -->
<script src="http://maxcdn.bootstrapcdn.com/bootstrap/3.3.5/js/bootstrap.min.js">
</script>
Font Awesome
Another toolkit that is widely used on web pages is Font Awesome. It is a font and icon toolkit based on CSS. Icons such as facebook, twitter, github and email can be added to our website anywhere with the <i>tag (see example here).
The easiest way to set up Font Awesome is using BootstrapCDN by MaxCDN (see here). The code to be included in the header of our site’s HTML is as following:
<link rel="stylesheet" href="https://maxcdn.bootstrapcdn.com/font-awesome/4.4.0/css/font-awesome.min.css">
Favicon
A favicon (Favourite icon, also known as a shortcut icon) is the icon or the small image that we can see next to the website’s title on the tab or the URL in the address bar of a browser. It is usually an image with 16x16 pixels. We could generate a favicon through many website, such as this one.
To add a favicon to a static HTML page, simply save the favicon.ico file in the root directory of our website, and include the following in the header of the HTML file:
<link rel="shortcut icon" href="/favicon.ico" type="image/x-icon">
Google Fonts
There is another small but important element in the design of a blog - the fonts. In this blog, I used Google Fonts, which is a free hosted API for web fonts, because it has a large collection of font families, the fonts are under free software licenses and served by reliable Google servers.
To use Google Fonts in our website, simply choose the font, add a link tag referring to the font in the header of our html file and integrate the fonts into our CSS file. Here is a completed example from the Google Fonts website.
Blog Comment Hosting Service - Disqus
A blog comment hosting service provides service to host on-line feedback and comments posted by users to blogs. There are many third-party commenting systems today that work cross-platform regardless of what the programming language or scripts our website is based on. They not only allow users to provide comment feedback but also have spam control, blacklist/whitelist management and enable integration with social media. These base comment systems don’t involve any additions (such as database) to our website and they are usually ready to be used once we set up our site.
I used Disqus in this blog for the following reasons: